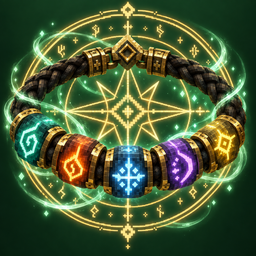
Getting Started
This page takes you from nothing to your first spell in a few minutes. You need cobblestone, a little lapis lazuli and some string.
- The idea in one minute
- Step 1: make Blank Runes
- Step 2: make a Twine Cord
- Step 3: wear it
- Step 4: cast your first spell
- Step 5: hold to charge
- Step 6: open the Cord screen
- Step 7: craft and learn more runes
- Step 8: your first real spells
- Mana and cooldowns
- The next Cords
- What to do next
The idea in one minute
You wear a Cord in its own inventory slot. A Cord has sockets, and you thread runes into them. The Cord reads them left to right as one spell:
- a shape says where the spell goes (a bolt, a burst around you, yourself),
- an effect says what happens there (fire, healing, a push),
- a modifier changes the rune on its left (stronger, wider, three copies),
- a link makes the rest happen later (when the bolt hits, a second later).
Bolt · Fire is a fire bolt. Bolt · Fire · Split is three of them. You learn a rune once and can use it in every spell. The full rules are on How a Spell Is Read.
Step 1: make Blank Runes
Put 4 Cobblestone around 1 Lapis Lazuli in a plus shape:
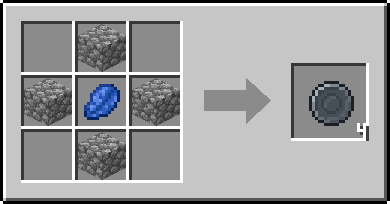
It makes 4 Blank Runes. Every rune recipe starts with one, so keep a few spare. Holding a Blank Rune unlocks the Twine Cord and rune recipes in your recipe book.
Step 2: make a Twine Cord
Put 3 String over a Blank Rune:
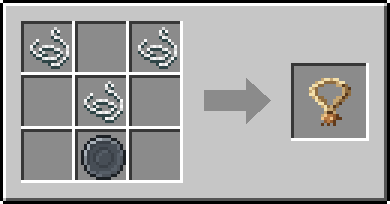
A Twine Cord holds one spell of 3 runes, only Tier I runes, and gives you 100 mana that refills at 5 a second.
Step 3: wear it
Open your inventory (E). Put the Cord in the new slot just above your offhand slot, or shift-click it. In Creative the slot is in the Survival Inventory tab.
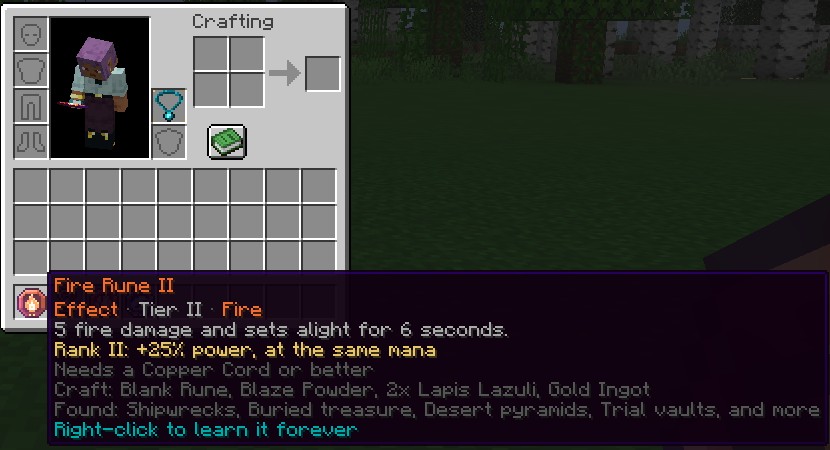 The Cord slot, just above the offhand. Hover any rune for what it does, which Cord it needs, and how to get it.
The first time you wear a Cord, you’re told:
Your Cord hums. You learned Self, Bolt and Push, and spell 1 is ready: R casts, V switches spell, K opens your Cord.
Your first spell is already threaded: Bolt · Push, a bolt that knocks back what it hits. Your Cord is never dropped when you die, and you never lose what you’ve learned.
Step 4: cast your first spell
Look at a creature and tap R. A bolt flies out and throws back whatever it hits.
 The spell panel: the spell’s number, its runes, its cost, your mana bar and your mana.
The panel by your hotbar shows the selected spell. After a cast the badge darkens and refills as it recharges. Bolt · Push costs 8 mana and is ready again after half a second. See Casting.
If nothing happens, a line above your hotbar says why:
| Message | Meaning |
|---|---|
| Wear a Cord first: the slot above your offhand (E) | No Cord in the Cord slot |
| Spell 1 is empty. Press K to thread runes | The spell has no runes that can fire |
| Recharging… | It’s still cooling down |
| Not enough mana | Wait, or meditate (below) |
Step 5: hold to charge
Hold R instead of tapping. Your spell’s circle opens behind you, ring by ring. Let go to cast. A full charge takes 1.5 seconds and makes the spell 40% stronger. You walk slower while you charge, and a faint line or ring shows where the spell will go.
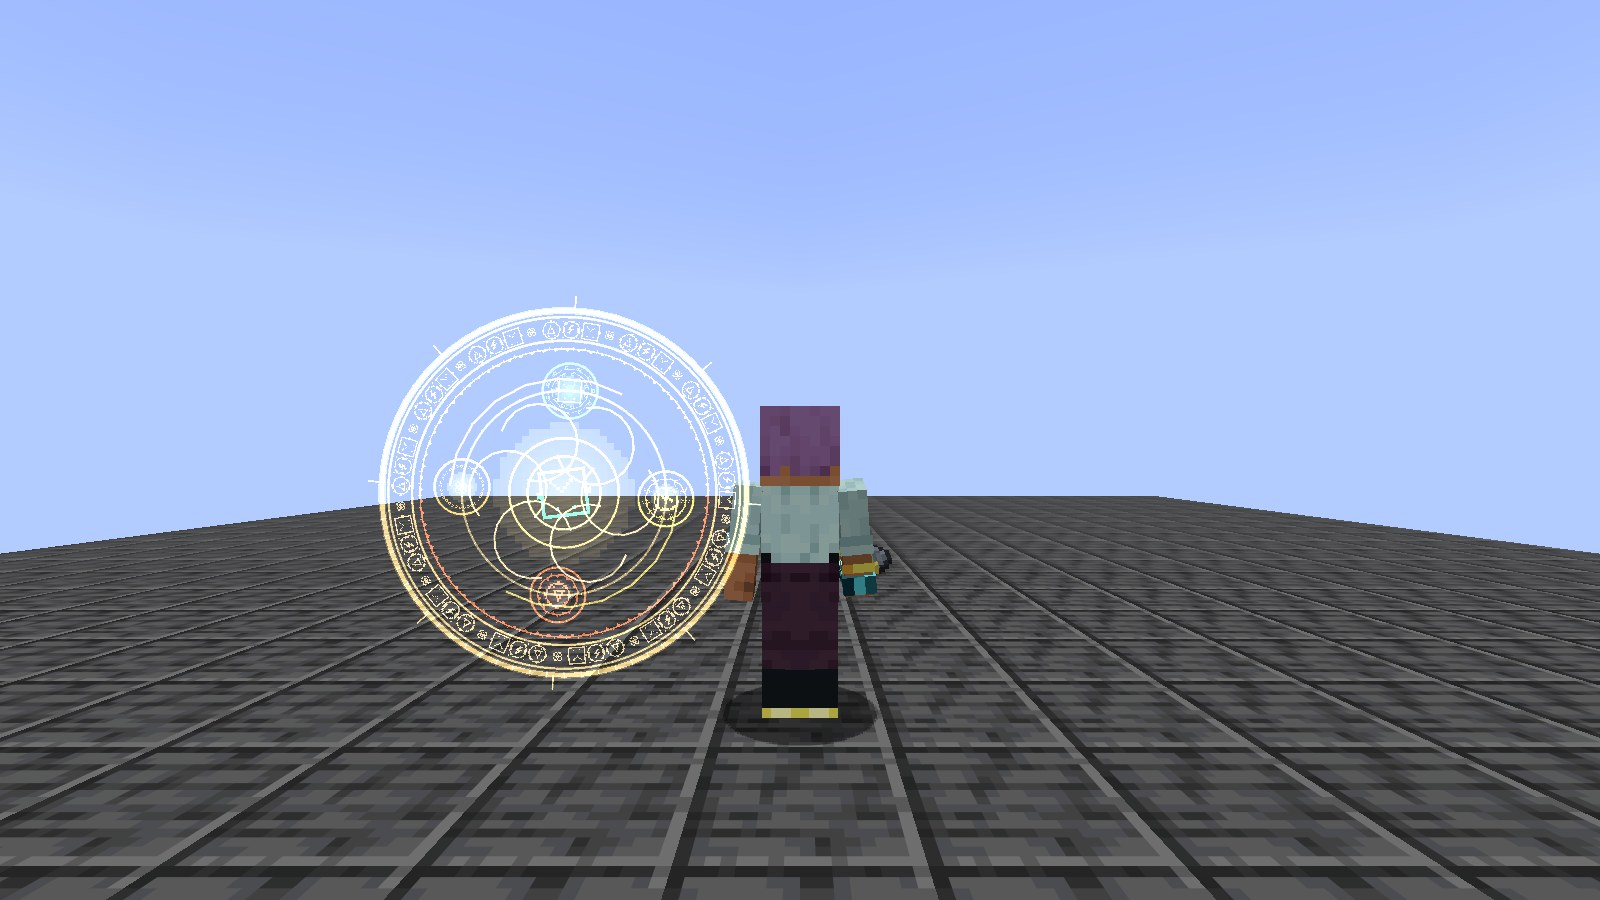
Tap for speed, charge for power. See Casting.
Step 6: open the Cord screen
Press K. The rows at the top are your spells. The Codex below lists every rune you know. The readout explains the selected spell, with its mana and cooldown.
Click a rune in the Codex to add it to the end of the spell, or drag it onto a socket. Click a threaded rune to remove it. Start typing to search. Changes save at once.
The screen doesn’t pause the game. See The Cord Screen.
Step 7: craft and learn more runes
Craftable runes are made from a Blank Rune and a few items, in any layout. Every rune’s tooltip says how to craft it.
To learn a rune, hold it and use it (right-click). It’s used up and is yours for good. If you already know it, nothing is used up: keep the spare for a Runesmith or the Fusion Altar.
Good first runes (all Tier I):
| Rune | What it does | Craft with a Blank Rune and |
|---|---|---|
 Ember Ember |
3 fire damage and sets the target alight for 3 seconds | Coal, Flint |
 Shock Shock |
4 lightning damage that arcs to one more enemy | Lightning Rod |
 Icicle Icicle |
4 freeze damage, 6 against a slowed target | Ice, Pointed Dripstone |
 Heal Heal |
Restores 8 health (4 hearts) | Glistering Melon Slice |
 Swift Swift |
Speed III for 10 seconds | 2 Sugar |
 Feather Fall Feather Fall |
Slow falling and no fall damage for 12 seconds | 2 Feathers |
 Barrier Barrier |
2 absorption hearts for 20 seconds | Glass, Amethyst Shard |
 Amplify Amplify |
+50% power to the effect on its left | Gold Ingot |
 Extend Extend |
Doubles how long the effect on its left lasts | 2 Redstone |
 Nova Nova |
Hits everything within 2.5 blocks of you | Gunpowder, Glowstone Dust |
 Spark Spark |
A quick, cheap spark (effects land at 75% power) | Flint, Glowstone Dust |
 Touch Touch |
Whatever you look at, within reach | Leather |
 Chisel Chisel |
Mines the block hit, like a stone pickaxe | Stone Pickaxe |
All recipes are on Rune Recipes. Every rune is listed in the Rune Codex.
Step 8: your first real spells
These fit a Twine Cord’s three sockets:
| Spell | What it does | Mana | Cooldown |
|---|---|---|---|
Bolt · Ember |
A burning bolt | 10 | 0.5 s |
Bolt · Ember · Amplify |
The same, 50% stronger | 13 | 0.65 s |
Heal |
Heals you | 12 | 0.6 s |
Self · Swift · Extend |
Speed III for 20 seconds | 9 | 0.5 s |
Nova · Push |
Throws back everything within 2.5 blocks | 9 | 0.5 s |
Spark · Ember |
A cheap, quick ember | 7 | 0.5 s |
Touch · Chisel |
Mines the block you look at | 3 | 0.5 s |
Self · Feather Fall |
No fall damage for 12 seconds | 6 | 0.5 s |
- Order matters. In
Bolt · Ember · Amplify, Amplify boosts Ember. InBolt · Amplify · Emberit does nothing, and the readout warns you. - You don’t always need a shape. A spell that starts with an effect is cast on you, so
Healalone heals you.
Mana and cooldowns
A spell’s cooldown comes from its cost: about a second for every 20 mana, from half a second up to 20 seconds. Each spell has its own cooldown.
Mana refills by itself. To refill faster, meditate: sneak and stand still while wearing your Cord, and mana comes back twice as fast. More ways to grow mana are on Mana.
The next Cords
Each Cord is crafted from the one before. Your spells and runes are saved on you, so changing Cords loses nothing.
| Cord | Sockets per spell | Spells | Rune tiers | Mana | Mana a second | Recipe |
|---|---|---|---|---|---|---|
| Twine Cord | 3 | 1 | I | 100 | 5 | 3 String over a Blank Rune |
| Copper Cord | 5 | 2 | I and II | 150 | 6 | Twine Cord, 4 Copper Ingots, 1 Amethyst Shard |
| Amethyst Cord | 8 | 3 | I to III | 225 | 7 | Copper Cord, 4 Amethyst Shards, 2 Gold Ingots |
| Echo Cord | 12 | 4 | I to IV | 300 | 8 | Amethyst Cord, 2 Echo Shards, 1 Netherite Scrap |
The upgrades can be laid out any way in the grid. See Cords.
What to do next
- Fill your Codex and test runes on a Training Dummy.
- Form your first Heart Circle. Mana you spend on spells condenses in your heart. After 600, meditate for 10 seconds without getting hurt. You gain more mana, a passive spell slot and an innate rune. See Heart Circles.
- Make a Copper Cord. Try
Bolt · On Hit · Burst · Fireand aSelf · Shield(Shields). - Walk the ley lines. Mana flows twice as fast on them.
- Hunt the Runebound, monsters that cast real spells, and learn to read their magic circles.
- Make an Amethyst Cord for Tier III, and try element reactions and secret spells.
- Find the Archive and defeat the Archivist.
- Build a Fusion Altar to rank up and fuse runes.
- Pick up a blade. Learn a breathing method on Aura, then test yourself against the Sword Masters.
All keys can be changed in Options > Controls > Key Binds. See Controls.